5 Interior Painting Hacks


When people think of hiring a painter, what kind of project are they most likely to do so for? Exteriors, and those specialty projects that need a professional touch, right? The truth is that a lot of homeowners don’t think painting is that hard of a job, and often will try to tackle interior projects on their own to “save money”.
This is just one reason why it is so important to produce a product far beyond what they expect. To show them that there is skill required in providing a high quality paint job, and that it can be done quickly and with ease. This will prove that there is great value in hiring you again. That is what this booklet is going to provide. 5 interior painting hacks to make your customers keep coming back for more.
City skyline
Tips To Make Painting Faster & More Efficient
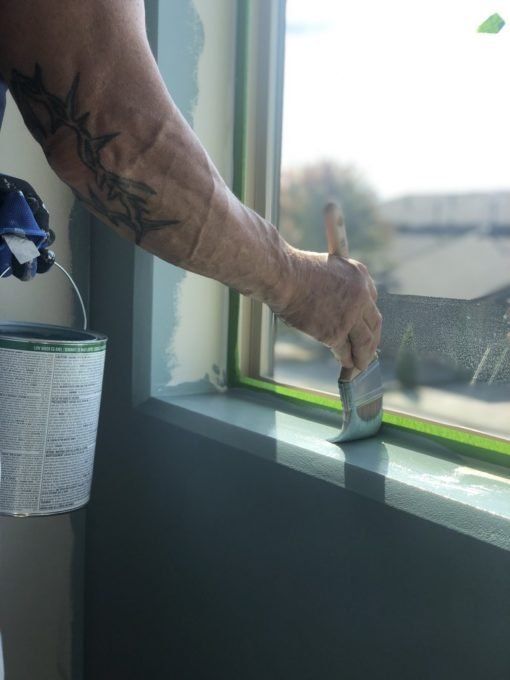
1. Painting Straight Lines with FrogTape and Caulking
To begin, let’s talk cut ins. I know there are a lot of painters out there who refuse to use tape. I get it. There is a time and place for it. And every painter should be well versed in not only how to cut in with just a brush, but how to do so well and efficiently. That being said, why not utilize tape where it makes the job go by quicker, and gives you a sharper line? Because let’s face it, you cannot beat the kind of straight line that a little tape can achieve. The technique, specifically, that I am referring to is painting straight lines with FrogTape and caulking. Practice what I am about to tell you, and soon enough you will be able to do this in the same amount of time that it would take you using just a brush. And I guarantee it’ll be a superior product, as well.
The reason we like FrogTape so much is because it is made with a technology that causes the tape to swell when moisture hits it. This helps minimize the potential for paint bleeding underneath it. We recognize that FrogTape is not cheap, that is why we use ShurTape CP-199 as our production tape and supplement with FrogTape when needed. You CAN use your production tape for these methods, but we have found that combining FrogTape and caulking is what gives us that high quality finish on rough surfaces that our clients desire.
As far as caulking goes, we use two kinds, depending on the surface. We use white, latex caulking for anything in which the trim or wall color is white, or close to it. And we will use clear, latex caulking for stained wood, metals, stripes on walls, or any surface that isn’t white. Clear caulking can be scary because it will be white up until it dries. But rest assured that it WILL dry clear. We do prefer using the white caulking to the clear, and try to use it as often as possible. White caulking is thicker, lasts longer, and does not shrink as much when drying. Meaning that if there is a gap between your wall and trim the caulking will do a better job at filling that in. It will also do a better job at getting under the tape and making sure bleeding doesn’t occur on textured surfaces like orange peel.
Now that you know WHAT we use, let’s get to what you are actually here for… the technique. It’s pretty simple, really. Just lay your tape down. Whether it be across a wall, along the trim, or around a window… lay it down. Then run a thin layer of your latex caulking across the edge of your tape that will be painted, and smooth across it with your finger. This removes the access, and ensures that the caulking is pushed into any gaps in the tape, creating that safety net for bleeding. Now just do what you do best, paint that baby. Before the caulking dries. Don’t be shy, load her up and add a generous coat of paint. Just be sure to use a gentle touch. For this method I like using a Premier Montauk brush. You can see the brush in more detail HERE. You don’t want to use too much pressure and push that caulking and paint under the tape. So just finesse the paint on top of the tape and you will be good to go.
Once the deed is done, pull the tape IMMEDIATELY, while the paint and caulking are still wet. This is probably our most asked question when it comes to using this method. The reason we pull the tape immediately is because if we allow it time to dry, we risk the paint bonding to the edge of the tape and peeling up when we go to remove it. A condition called bridging. This is also why we paint before the caulking dries as well. Both need to still be wet and emollient enough to not adhere to the tape when we go to remove it. If you are interested seeing how the method works, watch my YouTube video HERE
2. Rolling Walls with a Power Roller
The next hack or technique, whichever you choose to call these, that we will be going over is the benefits of rolling over walls with a power or inner fed roller. Something that I often tell my guys is “work smarter, not harder”. Meaning, find little ways to save time and make the work you do easier. This will save your body and keep you working longer; earning you a greater profit. However, this rule only applies as long as the quality of the product stays the same or increases. This is exactly why we love utilizing a Power Roller.
This amazing tool gives you the ability to roll a ceiling or wall, without having to continuously reload your nap. It will save you endless time AND energy. Last year one of my employees was skeptical. To make a point, we decided to have a little race. He with his standard roller and bucket. Me with the power roller. You know, because we like to keep it fun here at The Idaho Painter. I made him use a 9” because that is the only size the power roller nap comes in. He tried really hard to keep up with me… and to be honest, did a pretty decent job. However, he was moving EXTREMELY fast. And I was simply walking the length of the ceiling. Because of his speed, he wasn’t able to control quality very well. He was exhausted by the end of this experiment, AND had a lesser looking product. The consensus was that the pressure roller was not only easier to use, but saved time, and gave a high quality end result.
I know that some people would argue “but what about the set up and clean up?”. Honestly, it does not take much time to set up or clean up this tool. You will still be saving time… not to mention your back as well. The power roller does not drip, and is not messy, but it does have a few downsides. The first being that the nap only comes in 9” and 12” sizes. It would be nice to have larger, like and 18”, option for bigger spaces. But it is still more efficient despite this drawback. The second is the quality of the nap itself. This nap sheds like a Labrador in spring. You really have to make sure to de-shed it before that first use or you will end up with lint all over your walls. Once you do though, it is generally good to go. I think if Graco or Titan could get behind making better naps for this roller, and even having more options for it, then this would be an A+ product.
Regardless, this is sure to save you time, money, and back break. Watch my video on the Titan Inner-Fed roller HERE
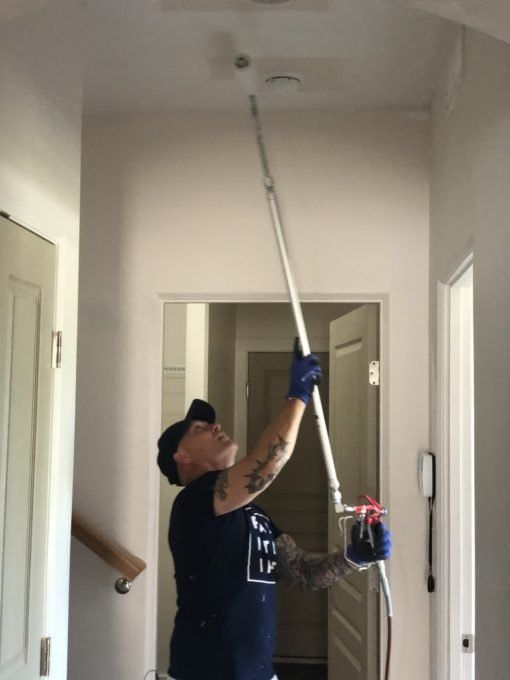
3. Rolling Ceilings Against the Light
There is more to rolling ceilings than just throwing paint all over it. If you are not careful you can end up with lap marks and flashing. Staring at those every day is enough to drive a good man insane… or maybe that is just because I am a painter and notice these things… Either way, the system we use for laying out ceilings will prevent this from happening.
To begin, we always use flat paint and a high quality roller on ceilings. I prefer the 3/8” Premier White Woven roller. Using a flat paint vs. a satin or semi-gloss will help to hide all of those imperfections and any flashing that could possibly occur from lap marks. We are struggling to find the ultimate ceiling paint, but any high quality, flat paint will do.
Preventing lap marks and flashing is all about the direction in which you roll, and how you lay out your ceiling. You want to look at where the lighting is coming into any given room and where people will predominantly be viewing the ceiling from. This is normally the door. You will want to paint against wherever this is. Meaning that when a person enters a room, the direction of the lap marks are going across them, not towards them. Once we have found what direction we should be painting, we begin to lay out our walls. What we have found that what works best to prevent flashing is to work in small squares all the way down the ceiling, making sure to keep a wet edge and that your roller stays loaded with paint, you do not want any part of your ceiling drying faster than the other. Once we make it all the way down we will load up our roller, once again, and walk the entire length of the ceiling. Making one continuous line. We will do this for the entire ceiling. Again, this is what we have found works best in preventing lap marks and flashing.
We have a few videos up on Paint Life TV if you would like to see these techniques in person.
Just a little something extra that we also do for our clients; we paint all ceiling vents and lights to match the ceiling. These are usually metal, so we prep them first with a can of bonding primer and then spray them with that same flat paint we used on the ceiling, using an airless handled spray gun. This is one of those little things that we do to put our work over the top, showing our clients that we take pride in adding simple details to give them an amazing finished project.
4. Painting Walls Fast: Skim Coating
There are several factors involved in painting walls. Some will aid you and others will do quite the opposite. As a professional painter I approach painting walls with multiple coats in mind. One coat is very rarely sufficient. Since two coats are necessary in most scenarios, and painting small projects will not be profitable unless you can get the job done in one trip, we will do the necessary steps to paint both coats and finish out the project in one day. Watch our video on painting walls fast on YouTube Paint Life TV HERE
Our first coat applied will be a coat of paint that should dry quickly. At this point, our goal is not full coverage. Our goal is to apply a thin coat that will dry fast yet still be heavy enough that our second coat will give 100% coverage. There are a few secrets that will give you more opportunity of success when skim coating walls.
The first is to turn up the forced air heating. This will make the walls dry faster. One advantage of forced air heating is that it reduces the moisture in the air. As you may well know, moisture, or humidity, slows down the drying process. Because of this, I like to turn the temperature up to around 75 Degrees.
Another tip is to increase air circulation. Do this by opening doors so you are not in a closed room. A closed room will increase in humidity rapidly when you start painting. Paint has a large amount of water in it so when you start painting and the paint begins to dry you are adding a lot of water into the air. When the humidity is higher, it results in a slower dry time.
Now that your temperature and humidity are correct, roll your walls quickly and with a light coat of paint. Get the paint on the wall and lay it out from top to bottom. Be conscious that if you do not lay out your paint correctly, your final coat may come out patchy. Also keep in mind that if you take too long to roll your skim coat, you will not be able to allow time for the paint to dry. Meaning you will not have time to apply the second coat and finish up the job in one day.
5. Use Flat Grey Wall Paint for Undercoat for Accent Colors
When you have an accent wall, especially a dark accent wall, you cannot just paint that color onto the wall. No matter how many coats you put on it, it will still be streaking because of the rich amount of pigment in the paint. Because of this, many painters apply a primer. Now, there are a lot of misconceptions about primers and what they actually do. Some primers are made for sealing. Some for bonding. If you use a primer for color coverage, all you are doing is creating a base, so that pigment does not float around. But what people don’t always understand is that wall primer is basically just a cheap flat wall paint.
And this is what we use and have found works best for us! The paint has to be FLAT. Semi-gloss or satin will not do the same. A great roller to paint interior wall paint with on numerous surface types is the Koda Wool roller. This roller loads up fast and lays out a nice finish every time and is durable enough to last many paint jobs. The flat sheen creates a porous, rough surface to keep the acrylic from sliding around during application. Not only do we use a flat paint in place of wall primer, but we make sure it is a grey flat paint. Using a grey paint, as opposed to a white or black, will ensure that you get full coverage with that first coat of your accent color. If you use a white, the base will be too light and it will show through your accent color. The same goes for a black, that darkness will show through. Grey, however, is a mid tone color. And will meet your accent color half way, making it the star of the show.
This has especially been true for us when painting reds. A lot of the time you will need to paint 2-4 coats of red before the color is consistent across the wall. In one instance it took 12 coats for us to get full opacity. But using a flat grey P4 tinted paint ensures that you will get better coverage, quicker. We have not run into this problem since utilizing this method. And it is something that I wish we had known sooner. This hack truly will save you a lot of heartache on the job. It will also save you coin, as you will need much less product to achieve that beautiful vibrant color your client is looking for.
So there you have it! 5 interior hacks to make your life easier, increase productivity, save time and money, and achieve an amazing product for your client. My hope has always been to help painters world wide. Whether they are self taught and learn from trial and error, like myself. Or they are union trained. Painters helping painters is so important in this community. There is more than enough work for all of us, and doing so is only going to continue to elevate the trade and bring attention to the complexity and importance of what we do. Showcasing technique and professional application, and that just the average Joe cannot achieve it without time and hard earned skill. We should take great pride in what we do, and always be searching for new tips and tricks to elevate our business and keep us on the top. Not only for ourselves, but for quality control for the client as well. Because at the end of the day, that is what we do. We take something old and worn, and make it new again. Putting smiles on peoples faces, and making this world a better place. One paint job at a time.
Visit the Paint Life Store to purchase our apparel, gifts for your favorite painter, and game changing tools approved by the Paint Life Crew CLICK HERE to enter the Paint Life store.